Anyone who’s held a wrench or a blueprint knows that when you work with copper pipe, you work with the lifeblood of many homes and buildings. It’s an art and science—it’s plumbing. Learning to cut copper pipes opens the floodgates to a world of DIY potential. From new installations to repairs, wielding a tubing cutter or a hacksaw can make the difference between leaks and reliability. This comprehensive guide will walk you through everything you need to know about cutting copper pipes, ensuring every slice succeeds.
The Basics of Copper Pipe Cutting
Before you notch into that copper, it’s key to remember the basics. Understanding the tools, identifying the types of pipes, and knowing the purpose of your cut is fundamental to the process.
Tools of the Trade
The tools for cutting copper pipes range from the traditional to innovative:

- Pipe Cutters: Wheels that score and cut through copper with precision.
- Hacksaws: Good old-fashioned saws that will do the job on tight budgets or cramped spaces.
- Tubing Cutters: These are like pipe cutters but are better for thicker pipes.
- Reciprocating Saws: Power tools designed to handle the most robust of pipes.
- Internal Tubing Cutters: These are used to cut pipes from the inside for simple de-burring and shaping.
These tools’ specific design features provide a clean cut while minimizing pipe damage.
Types of Pipes
PVC coated copper pipe are a unique subset of copper pipes offering additional protection against corrosion. Recognizing the type of pipe you’re cutting is essential, as different tools and techniques may be required based on the pipe’s properties.
Why You’re Cutting Matters
Are you transitioning to a new angle, lengthening a pipe, or fixing leaks? Your purpose will determine not just where you cut but how you cut.
Different Techniques for Different Needs
Copper is a tubing chameleon, able to adapt to a wide range of plumbing needs. Here are the primary techniques for cutting copper pipes:
With a Pipe Cutter
- Prepare the Pipe: Remove any burrs or sharp edges from the pipe end. Cutting with a light grasp can cause the tubing to spin, so securing the pipe will ensure a straight cut.
- Size It Up: Adjust the pipe cutter’s knob to the size of your pipe.
- Score the Pipe: Apply pressure to the cutter and rotate it around the pipe. The cutting wheel should score the pipe’s surface. For thicker pipes, make several rotations, tightening the cutter after each pass.
- Cut the Pipe: Continue rotating the cutter, tightening and untightening it, until the pipe snaps.
With a Hacksaw
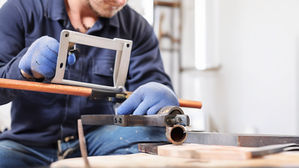
- Prepare the Pipe: Cleaning the outside will produce a more manageable and precise cut.
- Mark Your Cut: Use a sharpie to draw a clear line where the cut should be.
- Brace the Pipe: For the best results, the pipe should be secure to prevent it from bouncing and moving.
- Cut the Pipe: Saw through the pipe using the entire blade and support your arm to keep the cut straight.
- De-burr and Clean: After cutting the pipe, remove rough edges and filings with a metal file or emery cloth.
With a Reciprocating Saw
- Prepare the Pipe: Like with a hacksaw, clean and mark your cut line.
- Use a Support Block: It’s recommended to place a wood support block over the pipe to keep the saw steady and absorb the vibration.
- Cut the Pipe: Start the saw, and with a firm grip, apply light pressure to guide it through the marked line.
- De-Burr and Clean: Finish with a water-based emery cloth to clean the pipe edges and interior.
Safety First
Safety glasses and gloves should never be optional when cutting copper pipes. Pipes can have sharp burrs and projecting edges, making protective gear a necessity.
Tips for a Smooth and Safe Operation
- Always cut away from your body.
- Keep control of the pipe at all times during the cutting process.
- Make sure your tools are sharp and appropriately sized for the job.
- The proper extension cords and circuit breakers are of the utmost importance when using power tools.
Troubleshooting Common Issues
From pipes that don’t fit to wobbly cuts, troubleshooting can turn a potential disaster into a DIY victory.
My Cut is Not Straight
It can be difficult to cut straight through a curved pipe. A hand tool, especially a pipe cutter, can help evenly mark and cut around the pipe. A support block and firm, steady hand are key for a reciprocating saw.
The Pipe is Too Long
In the immortal words of Alton Brown, your best tool in the kitchen is a trash can! Sometimes, the best cut is to start over with a new section of pipe.
My Pipe Won’t Fit
Double-check your measurements and consider the additional length your fittings will need.
After the Cut
The work continues once the pipe is cut. Ensuring the cut is clean, free of debris, and ready to work is essential.
Filing and De-Burring
Remove all burrs and metal filings to prevent debris from causing clogs or damage within the pipe system.
Cleaning the Pipe
Dust and metal shavings can lead to issues later, including contamination of water systems or blockages. A quick rinse with water should suffice.
Test Your Fit
Before soldering or cementing, always test the fit of your cuts. Fittings should slip onto the pipework smoothly and without resistance.
Going Further
From cutting to fitting, there’s a lot to learn in copper plumbing. Resources are plentiful, from hardware stores to online communities where the collective wisdom of DIYers can elevate everyone’s game.
Continuous Learning
Plumbing is a skill that benefits from practice and understanding the broader principles of fluid dynamics and home construction. The more you know, the better you’ll be when you face new challenges.
Professional Help
If the going gets tough, remember that professional plumbers are a phone call away. Sometimes, the cost of a cut is more than its measure.
Conclusion: Mastering the Art of Cutting Copper Pipes
Cutting copper pipes is a fundamental skill for any DIY enthusiast or professional plumber. Armed with the right tools, safety measures, and techniques, you can ensure that each cut achieves its immediate purpose and contributes to durable and watertight plumbing systems.
Take the time to learn the nuances of the tools you use and the properties of the pipes you work with. Remember that patience and accuracy will yield the best results, and never be afraid to ask for help or seek additional resources.
With this guide, you’re ready to slice through tasks that once seemed daunting, transforming them into manageable projects that increase your confidence and skill set. Like copper itself, elevate your work and watch your DIY capabilities glisten with each cut.